1. 概述
通过本文你将可以搭建起长安链多节点集群,并使用命令行工具和SDK完成长安链功能的体验。
通过源码搭建长安链并且上链查数据需要以下步骤,本文将一一演示
下载长安链及证书管理工具源码
编译源码
生成节点证书
编译及安装包制作
启动节点集群
查看节点状态
使用CMC工具安装、调用、查询一个合约
使用GO SDK验证合约
2. 环境依赖
2.1. 硬件依赖
| 配置 | 最低配置 | 推荐配置 |
|---|---|---|
| CPU | 1.5GHz | 2.4GHz |
| 内存 | 4GB | 8GB |
| 核心 | 4核 | 8核 |
| 带宽 | 2Mb | 10Mb |
2.2. 软件依赖
当前文档在centos7.6操作下完成,以下为本次演示所需的依赖 软件列表如下:
| 名称 | 版本 | 描述 | 是否必须 |
|---|---|---|---|
| git | / | 源码管理 | 是 |
| golang | 1.15+ | 编译环境 | 是 |
| docker | 18+ | 独立运行容器 | 否 |
| docker-compose | / | 容器管理组件 | 否 |
| gcc | 4+ | 编译环境依赖 | 是 |
| glibc | 2.18 | 智能合约执行环境依赖 | 是 |
| tmux | / | 默认快速启动命令依赖 | 否 |
| wasmer运行时库 libwasmer_runtime_c_api.so | / | 库在chainmaker-go/main目录下,将该库路径添加至系统PATH环境变量下启动脚本默认包含,单独启动需加上如下配置: cd deployPath/lib cp xxx/main/libwasmer_runtime_c_api.so libwasmer.so export LD_LIBRARY_PATH=deployPath/lib:$LD_LIBRARY_PATH |
是 |
2.2.1. git
下载地址:https://git-scm.com/downloads
安装步骤,请参看:https://git-scm.com/book/en/v2/Getting-Started-Installing-Git
2.2.2. golang
版本为1.15或以上
安装步骤,请参看:https://golang.org/doc/install
2.2.3. docker
若不使用采用
docker方式搭建集群,可以不安装
2.2.4. docker-compose
若不使用采用
docker方式搭建集群,可以不安装
3. 环境搭建
目前支持通过脚本搭建、使用Docker搭建、以及通过长安链管理台可视化界面搭建链,如果您是区块链的资深开发人员,可使用前两种部署方式;如果您是初学者或者对区块链有管理需求,比如部署合约、通过浏览器查询链上信息等,可使用长安链管理台进行搭建链。
3.1. 使用脚本搭建
适用于
Linux、MacOS
3.1.1. 源码下载
从长安链官网下载源码:https://git.chainmaker.org.cn/chainmaker/chainmaker-go
当前为私有仓库,需要先进行账号注册
下载
chainmaker源码到本地
$ git clone --recursive -b v1.2.5 https://git.chainmaker.org.cn/chainmaker/chainmaker-go.git
下载证书生成工具源码到本地
$ git clone --recursive https://git.chainmaker.org.cn/chainmaker/chainmaker-cryptogen.git
3.1.2. 源码编译
编译证书生成工具
$ cd chainmaker-cryptogen/src
$ go mod tidy
$ cd ..
$ make
3.1.3. 证书及配置文件生成
将编译好的
chainmaker-cryptogen,软连接或拷贝到chainmaker-go/tools目录
# 进入工具目录
$ cd chainmaker-go/tools

# 软连接chainmaker-cryptogen到tools目录下
$ ln -s ../../chainmaker-cryptogen/ .
进入
chainmaker-go/scripts目录,执行prepare.sh脚本生成单链4节点集群配置,存于路径chainmaker-go/build中prepare.sh脚本支持生成solo模式节点证书和配置,以及4/7/10/13/16节点的证书和配置
# 进入脚本目录
$ cd ../scripts

# 查看脚本帮助
$ ./prepare.sh -h
Usage:
  prepare.sh node_cnt(1/4/7/10/13/16) chain_cnt(1-4) p2p_port_prefix(default:11300) rpc_port_prefix(default:12300)
    eg1: prepare.sh 4 1
    eg2: prepare.sh 4 1 11300 12300

# 生成单链4节点集群的证书和配置
$ ./prepare.sh 4 1
begin check params...
begin generate certs, cnt: 4
input consensus type(default 1/tbft):
input log level(default INFO):
begin generate node1 config...
begin generate node2 config...
begin generate node3 config...
begin generate node4 config...

# 查看生成好的节点证书和配置
$ tree -L 3 ../build/
../build/
├── config
│   ├── node1
│   │   ├── certs
│   │   ├── chainconfig
│   │   ├── chainmaker.yml
│   │   └── log.yml
│   ├── node2
│   │   ├── certs
│   │   ├── chainconfig
│   │   ├── chainmaker.yml
│   │   └── log.yml
│   ├── node3
│   │   ├── certs
│   │   ├── chainconfig
│   │   ├── chainmaker.yml
│   │   └── log.yml
│   └── node4
│       ├── certs
│       ├── chainconfig
│       ├── chainmaker.yml
│       └── log.yml
├── crypto-config
│   ├── wx-org1.chainmaker.org
│   │   ├── ca
│   │   ├── node
│   │   └── user
│   ├── wx-org2.chainmaker.org
│   │   ├── ca
│   │   ├── node
│   │   └── user
│   ├── wx-org3.chainmaker.org
│   │   ├── ca
│   │   ├── node
│   │   └── user
│   └── wx-org4.chainmaker.org
│       ├── ca
│       ├── node
│       └── user
└── crypto_config.yml
关于自动生成的端口说明
通过prepare.sh脚本生成的配置,默认是在单台服务器上部署,故自动生成的端口号,是从一个起始端口号开始依次递增,可以通过命令行参数修改起始端口号。
主要有2个端口,p2p端口(用于节点互联)和rpc端口(用于客户端与节点通信),p2p起始端口为11301,rpc起始端口为12301。
如果生成4个节点的配置,p2p端口分别为:11301、11302、11303、11304,rpc端口分别为:12301、12302、12303、12304
如果是在多机部署,希望生成固定的端口号,请参考:【多机部署】
3.1.4. 编译及安装包制作
执行
build_release.sh脚本,将编译chainmaker-go模块,并打包生成安装,存于路径chainmaker-go/build/release中
$ ./build_release.sh
$ tree ../build/release/
../build/release/
├── chainmaker-V1.0.0-wx-org1.chainmaker.org-20210406194833-x86_64.tar.gz
├── chainmaker-V1.0.0-wx-org2.chainmaker.org-20210406194833-x86_64.tar.gz
├── chainmaker-V1.0.0-wx-org3.chainmaker.org-20210406194833-x86_64.tar.gz
├── chainmaker-V1.0.0-wx-org4.chainmaker.org-20210406194833-x86_64.tar.gz
└── crypto-config-20210406194833.tar.gz
3.1.5. 启动节点集群
执行
cluster_quick_start.sh脚本,会解压各个安装包,调用bin目录中的start.sh脚本,启动chainmaker节点
$ ./cluster_quick_start.sh normal
启动成功后,将*.gar.gz备份,以免下次启动再次解压缩时文件被覆盖
$ mkdir -p ../build/bak
$ mv ../build/release/*.tar.gz ../build/bak
若需要关闭集群,使用脚本:
$ ./cluster_quick_stop.sh
3.1.6. 查看节点启动使用正常
查看进程是否存在
$ ps -ef|grep chainmaker | grep -v grep
25261  2146  4 19:55 pts/20   00:00:01 ./chainmaker start -c ../config/wx-org1.chainmaker.org/chainmaker.yml
25286  2146  4 19:55 pts/20   00:00:01 ./chainmaker start -c ../config/wx-org2.chainmaker.org/chainmaker.yml
25309  2146  4 19:55 pts/20   00:00:01 ./chainmaker start -c ../config/wx-org3.chainmaker.org/chainmaker.yml
25335  2146  4 19:55 pts/20   00:00:01 ./chainmaker start -c ../config/wx-org4.chainmaker.org/chainmaker.yml
查看端口是否监听
$ netstat -lptn | grep 1230
tcp6       0      0 :::12301                :::*                    LISTEN      25261/./chainmaker
tcp6       0      0 :::12302                :::*                    LISTEN      25286/./chainmaker
tcp6       0      0 :::12303                :::*                    LISTEN      25309/./chainmaker
tcp6       0      0 :::12304                :::*                    LISTEN      25335/./chainmaker
检查节点是否有
ERROR日志
$ cat ../build/release/chainmaker-V1.0.0-wx-org1.chainmaker.org/bin/panic.log
$ tail -f ../build/release/chainmaker-V1.0.0-wx-org1.chainmaker.org/log/system.log
$ tail -f ../build/release/chainmaker-V1.0.0-wx-org1.chainmaker.org/log/system.log|grep "ERROR\|put block\|all necessary"
3.2. 使用Docker搭建
适用于
Docker
3.2.1. 编译docker镜像
$ cd chainmaker-go
# 生成镜像名称举例:chainmaker:v1.1.1,v1.1.1为版本号,如需要修改版本,请修改Makefile文件
$ make docker-build
# 查看编译完成的镜像
$ docker images
REPOSITORY                            TAG       IMAGE ID       CREATED        SIZE
chainmakerofficial/chainmaker         v1.1.1    04370b9a71ee   1 weeks ago    407MB
chainmakerofficial/chainmaker         lasest    04370b9a71ee   1 weeks ago    407MB
3.2.2. 启停solo节点
为了方便使用,使用的配置文件及证书已放置于目录:
chainmaker-go/scripts/docker/config/solo如镜像名称有调整,请修改
solo.docker-compose.yml文件
$ cd chainmaker-go/scripts/docker/
# 启动solo节点
$ ./solo_up.sh
# 关闭solo节点
$ ./solo_down.sh
3.2.3. 启停4节点集群
为了方便使用,使用的配置文件及证书已放置于目录:
chainmaker-go/scripts/docker/config/four-nodes如镜像名称有调整,请修改
four-nodes.docker-compose.yml文件
$ cd chainmaker-go/scripts/docker/
# 启动4节点集群
$ ./four-nodes_up.sh
# 关闭4节点集群
$ ./four-nodes_down.sh
4. 功能验证
为了验证所搭建的链功能是否正常,可以通过cmc命令行工具或sdk的单元测试用例来进行验证。
4.1. cmc命令行工具验证
请参看:【命令行工具】
4.2. go sdk验证
4.2.1. 下载go sdk源码
在
chainmaker-go工程同级目录,执行下面命令获取go sdk
$ git clone --recursive -b v1.2.5 https://git.chainmaker.org.cn/chainmaker/chainmaker-sdk-go.git
4.2.2. 关联证书
将通过
prepare.sh工具生成的crypto-config目录,软连接到chainmaker-sdk-go/testdata目录
$ cd chainmaker-sdk-go/testdata

# 这里我们使用新生成的用户证书,请先将testdata已有的crypto-config移除
$ /bin/rm -rf crypto-config
# 软连接使用prepare.sh脚本生成的证书目录
$ ln -s ../../chainmaker-go/build/crypto-config/ .
4.2.3. 配置修改
修改sdk单元测试使用的配置文件:
chainmaker-sdk-go/testdata/sdk_config.yml
根据需要修改节点地址:
    nodes:
      - # 节点地址,格式为:IP:端口:连接数
        node_addr: "127.0.0.1:12301"
如果证书路径有调整,修改对应的证书路径配置:
    # 客户端用户私钥路径
    user_key_file_path: "./testdata/crypto-config/wx-org1.chainmaker.org/user/client1/client1.tls.key
    # 客户端用户证书路径
    user_crt_file_path: "./testdata/crypto-config/wx-org1.chainmaker.org/user/client1/client1.tls.crt"
    # 客户端用户交易签名私钥路径(若未设置,将使用user_key_file_path)
    user_sign_key_file_path: "./testdata/crypto-config/wx-org1.chainmaker.org/user/client1/client1.sign.key"
    # 客户端用户交易签名证书路径(若未设置,将使用user_crt_file_path)
    user_sign_crt_file_path: "./testdata/crypto-config/wx-org1.chainmaker.org/user/client1/client1.sign.crt"
4.2.4. 执行存证合约单测
该单测会进行存证合约的部署、调用和查询。
$ cd chainmaker-sdk-go
$ go test -v -run UserContractClaim
看到类似输出,说明功能验证成功:
2021-04-07 21:45:25.510 [DEBUG] [SDK] chainmaker-sdk-go/sdk_client.go:343 [SDK] proposalRequest resp: message:"SUCCESS" contract_result:<result:"{\"file_hash\":\"9387687162f344b79b39385c5e998f97\",\"file_name\":\"file_1617803123443\",\"time\":\"1617803123443\"}" gas_used:25145486 >
5. 使用goland启动链
5.1. 下载安装goland
下载地址:https://www.jetbrains.com/go/
goland使用,请参看:https://www.jetbrains.com/go/learn/
5.2. 下载安装golang
5.2.1. 安装golang
版本为1.15或以上
安装步骤,请参看:https://golang.org/doc/install
5.2.2. 设置代理
打开终端执行
go env -w GOPROXY=https://goproxy.io,direct
5.3. 下载源码
git clone --recurse-submodules -b v1.2.5 https://git.chainmaker.org.cn/chainmaker/chainmaker-go.git
5.4. 启动goland
5.4.1. 导入chainmaker-go
将从官网下载的chainmaker-go导入到goland中
5.4.2. 配置goland
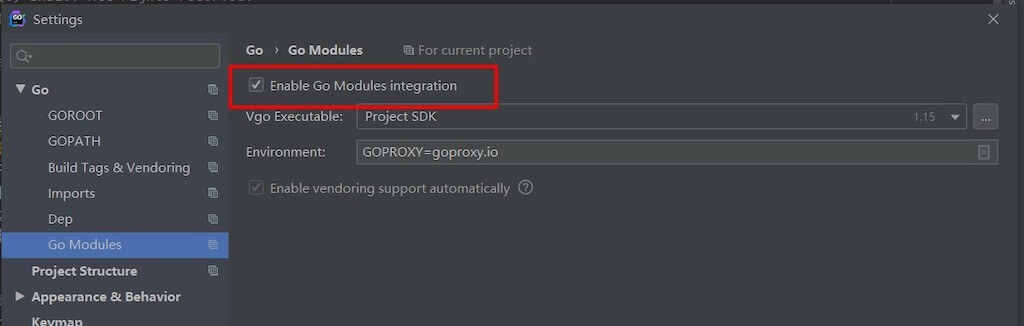
Ctrl+Alt+S 或者 File->Settings…
Go–>Go Modules –> 勾上Enable Go Modules integration
Go–>GOROOT–>添加已安装的go
5.4.3. 启动项目(SOLO模式)
修改配置文件
chainmaker-go/config/wx-org1/chainconfig/bc1.yml:
1. 将consensus.type修改为0:启用solo共识
2. 将consensus.nodes中org2-org7的列表删除,只留`wx-org1.chainmaker.org`如下:
#共识配置
consensus:
  # 共识类型(0-SOLO,1-TBFT,3-HOTSTUFF,4-RAFT,10-POW)
  type: 0
  # 共识节点列表,组织必须出现在trust_roots的org_id中,每个组织可配置多个共识节点,节点地址采用libp2p格式
  nodes:
    - org_id: "wx-org1.chainmaker.org"
      node_id:
        - "QmcQHCuAXaFkbcsPUj7e37hXXfZ9DdN7bozseo5oX4qiC4"
#    - org_id: "wx-org2.chainmaker.org"
#      node_id:
#        - "QmeyNRs2DwWjcHTpcVHoUSaDAAif4VQZ2wQDQAUNDP33gH"
#    - org_id: "wx-org3.chainmaker.org"
#      node_id:
#        - "QmXf6mnQDBR9aHauRmViKzSuZgpumkn7x6rNxw1oqqRr45"
#    - org_id: "wx-org4.chainmaker.org"
#      node_id:
#        - "QmRRWXJpAVdhFsFtd9ah5F4LDQWFFBDVKpECAF8hssqj6H"
#    - org_id: "wx-org5.chainmaker.org"
#      node_id:
#        - "QmVSCXfPweL1GRSNt8gjcw1YQ2VcCirAtTdLKGkgGKsHqi"
#    - org_id: "wx-org6.chainmaker.org"
#      node_id:
#        - "QmPpx5dTZ4A1GQ9a4nsSoMJ72AtT3VDgcX2EVKAFxJUHb1"
#    - org_id: "wx-org7.chainmaker.org"
#      node_id:
#        - "QmVGSXfz6vgXBjWiZh5rV8T5nutevvunHAfEoe6Sh5Xcyx"
chainmaker-go/config/wx-org1/chainmaker.yml:
1. 将net.seeds删除仅留下与wx-org1.chainmaker.org对应的node_id,如下
net:
  provider: LibP2P
  listen_addr: /ip4/0.0.0.0/tcp/11301
  seeds:
    - "/ip4/127.0.0.1/tcp/11301/p2p/QmcQHCuAXaFkbcsPUj7e37hXXfZ9DdN7bozseo5oX4qiC4"
  tls:
    enabled: true
    priv_key_file: ../config/wx-org1/certs/node/consensus1/consensus1.tls.key
    cert_file:     ../config/wx-org1/certs/node/consensus1/consensus1.tls.crt
chainmaker-go/config/wx-org1/log.yml将 log_in_console修改为true:在控制台输出日志
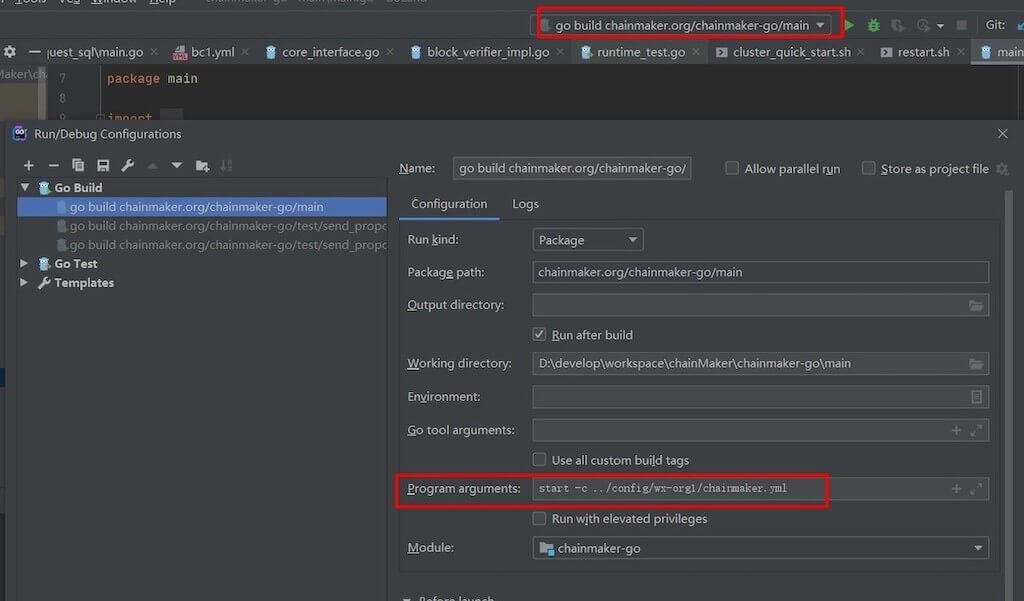
启动
找到文件 chainmaker-go/main/main.go 直接运行,然后点击停止,修改启动参数为start -c ../config/wx-org1/chainmaker.yml再次点击运行即可;见下图:

5.4.4. 测试
找到文件chainmaker-go/test/send_proposal_request_solo/main.go直接运行main即可
若遇到文件未找到等错误,请将goland 的配置: working directory修改为当前目录,或者手动修改文件目录
6. 视频教程
注:此视频教程为v1.0.0版本,长安链开源最新版本为v1.2.5,视频中遇到与版本号相关的,请更改为最新的版本。若为master分支,则已是最新1.2.5版本
如:合约镜像为:docker pull chainmakerofficial/chainmaker-go-contract:1.2.5
时间脚本:
• 01-04分钟:长安链简介及大纲介绍;
• 04-09分钟:环境安装演示;
• 09-26分钟:单机部署;
• 26-36分钟:智能合约开发(穿插常见问题);
• 36-54分钟:部署合约(穿插常见问题);
• 54—结束:常见问题及单机&多机部署对照表。

7. 常见问题
此处介绍可能遇到的常见问题
7.1. 编译时错误
编译chainmaker-go及chainmaker-cryptogen时可能出现的错误
7.1.1. missing go.sum entry
Q:
如果执行 ./build_release.sh 时或者在启动时报错:misssing go.sum entry: to add it,分别在 chainmaker-go/main 或者 chainmaker-go/common 和 chainmaker-go/tools/cmc 下执行 go mod download ,执行完后再重试
问题描述如下图:
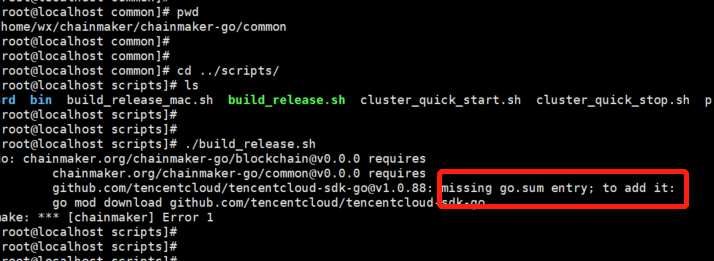
A:
原因:go1.15 版本 执行go build时会自动下载依赖,会更新mod文档,在go 1.16版本这一行为被禁止了。想要安装、更新依赖只能使用go get, go mod download, go mod tidy等命令,go build和go test将不会再做这类工作。
在go1.16版本中,想要自动更新依赖可以使用 go build -mod=mod,
进入对应go.mod文件所在目录执行go mod download
# chainmaker-go项目
cd  chainmaker-go/main
go mod download

cd  chainmaker-go/common
go mod download

cd  chainmaker-go/tools/cmc
go mod download

# # chainmaker-cryptogen项目
cd  chainmaker-cryptogen/src
go mod download
7.1.2. go.mod no such file or directory
Q:
编译时报错:
go: chainmaker.org/chainmaker-go/blockchain@v0.0.0 requires chainmaker.org/chainmaker-go/common@v0.0.0: parsing ../common/go.mod: open /mnt/d/develop/workspace/go/noSubmodule/chainmaker-go/common/go.mod: no such file or directory
A:
可能是因为clone或者切换分支时未使用submodule模式,需初始化或者更新submodule,如下命令
git submodule init
git submodule update
正确的clone方式:
git clone --recursive -b v1.2.5 https://git.chainmaker.org.cn/chainmaker/chainmaker-go.git
7.2. 启动时错误
7.2.1. not found GLIBC_2.18
Q:
若出现错误
./chainmaker: /lib64/libc.so.6: versionGLIBC_2.18’ not found (required by /root/git-code/chainmaker-go/module/vm/wasmer/wasmer-go/libwasmer.so)`
A:
在linux下可进入chainmaker-go/scripts/3rd目录安装glibc-2.18.tar.gz依赖
# 注:此操作为安装替换GCC版本,请慎重操作。一旦出错系统将不可用。
cd scripts/3rd
sh install.sh
7.2.2. restart.sh 权限不足
Q:
[root@localhost scripts]# ./cluster_quick_start.sh normal ===> Staring chainmaker cluster START ==> /home/wx/chainmaker/chainmaker-go/build/release/chainmaker-V1.0.0-wx-org1.chainmaker.org ./cluster_quick_start.sh: line 51: ./restart.sh: Permission denied
A:
如果启动时出现restart.sh 权限不足问题,给restart.sh 增加执行权限
给项目源文件添加执行权限
cd chainmaker-go/script/bin
chmod +x *.sh
给部署文件添加执行权限
# 进入四个节点的bin目录下 执行下面命令(以第一个节点 org1 为例)
cd chainmaker-go/build/release/chainmaker-V1.0.0-wx-org1.chainmaker.org/bin
chmod +x *.sh
7.3. 运行时错误
7.3.1. syscall/js.valueGet not exported
Q:
执行gasm合约时报错:resolve imports: syscall/js.valueGet not exported in module env
A:
tinygo不支持fmt等函数
7.3.2. runtime type error | byte code validation failed
Q:
发送交易成功,但链打印错误信息:contract invoke failed, runtime type error, expect rust:[2], but got 4。同时根据该交易id查询到交易错误信息。
failed to create vm runtime, contract: contract_test, [contract_test], byte code validation failed
A:
执行交易时异步的(查询类交易除外),返回的状态为链成功接收到交易的状态。执行合约是,runtimeType选择错误,需要根据自己的合约语言选择对应的runtimeType。
byte code validation failed:可能原因:1、运行类型错误;2、wasm文件损坏;3、wasm文件非官网指定渠道编译
| 语言 | 类型 |
|---|---|
| 系统合约 | RuntimeType_NATIVE = 1 |
| rust | RuntimeType_WASMER = 2 |
| c++ | RuntimeType_WXVM = 3 |
| tinygo | RuntimeType_GASM = 4 |
| solidity | RuntimeType_EVM = 5 |
7.3.3. 返回成功,但实际执行失败
Q:
使用sdk执行安装、调用合约时,SDK 返回message为ok,但链和交易显示执行失败
A:
交易的执行是异步的。SDK返回的成功信息指的是链成功接收到该交易。
获取查看交易实际结果的方式:
根据txId查询该交易,解析出结果。
使用SDK是选择同步发送交易,等待执行结果。
7.4. 其他关键信息
7.4.1. 出块标记是什么
进入log目录,查看日志文件 筛选
put block即可
cat system.log|grep "ERROR\|put block"其中一行解释如下:
2021-04-22 13:50:56.647 [INFO] [Storage] @chain1 store/blockstore_impl.go:241 chain[chain1]: put block[12] (txs:1 bytes:8078), time used (mashal:0, log:2, commit:5, total:7)
时间 [日志级别] [模块] @链名称 文件名.go:行数 链chain[链名称]:put block[区块高度](txs:交易个数 bytes:区块大小), 使用时间毫秒(mashal:0, log:2, commit:5, total:7)

7.4.2. 组网成功标记是什么
组网成功后,即可发送交易。此时接收到的交易将进入到交易池当中,并且会广播给网络的每一个节点(共识、见证节点、轻节点),随后等待共识成功选举leader开始打包区块。
SOLO共识
start blockchain[chain1] success
其他共识
进入log目录,查看日志文件 筛选
all necessary peers connected和start blockchain[chain1] success可看到如下日志
cat system.log|grep "init blockchain\|all necessary peers connected"2021-04-22 16:13:07.520 [INFO] [Net] p2p/libp2p_connection_supervisor.go:91 [ConnSupervisor] all necessary peers connected.

